The Graco Magnum X7 is one of the most reliable airless sprayers in its price class. In our experience as an authorized Graco dealer, it’s also one of the most consistently abused machines we see come in for parts — not because it’s fragile, but because owners skip a handful of maintenance habits that seem minor and turn out to be catastrophic.
The pattern is almost always the same: machine works perfectly for one season. No maintenance between jobs, storage without Pump Armor, unstrained paint loaded directly from a new can, inlet strainer never inspected. At the start of season two, the machine won’t prime. The owner starts diagnosing. By the time they get to us, the inlet ball is bonded to its seat, the pump packings have seen 180 gallons on a 125-gallon annual-rated machine, and there’s paint visible at the pump housing. What should have been a $65 pump kit has become a $200–$400 repair depending on whether the cylinder bore survived.
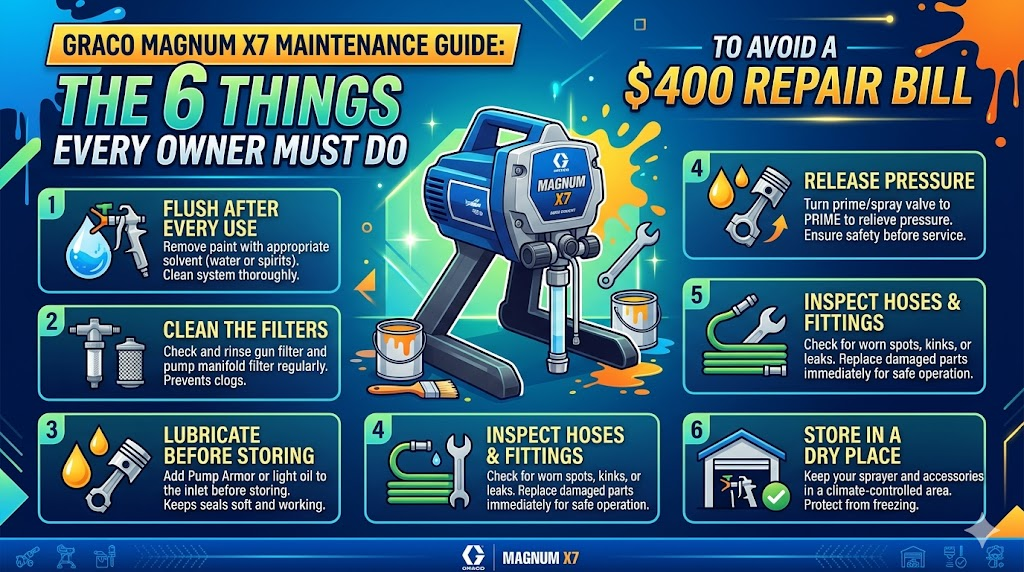
This guide covers the six maintenance habits that prevent that outcome. They take a total of about 40 minutes per season plus 10 minutes per job. The parts referenced throughout are available as genuine OEM components via our Graco Magnum X7 parts page with same-day shipping from Houston on qualifying orders before 1pm CST.
What Skipping Maintenance Actually Costs — The Numbers
Before the six steps, here’s the financial case for doing them. Each row represents one maintenance habit, what it costs if you skip it, and what it costs if you do it.
| Maintenance Habit | Cost If Skipped | Cost to Do It |
| Run Pump Armor after every job | $65–$200 (pump rebuild or replacement) | $8 per bottle / 30 seconds |
| Flush completely after every job | $65–$200 (dried paint in valves) | 10 minutes + free water |
| Strain paint before loading | $5–15 (gun filter + tip clogs) | $3 mesh strainer |
| Replace gun filter regularly | $15–30 (tip replacement from wear) | Under $2 per filter |
| Run the cycling interval test | $65–$400 (preventable pump failure) | 60 seconds per job |
| Inspect hose before exterior jobs | $50–$400+ (hose blowout injury/damage) | 2 minutes per job |
None of these habits require special tools or technical knowledge. They require time — about 15 minutes per job for the routine habits, and 60 seconds for the test that tells you when service is approaching. That’s the cost-benefit equation. Let’s go through each one.
STEP 1 Run Pump Armor After Every Single Job 30 seconds | Cost if skipped: $65–$200 pump repair
This is the most important maintenance habit for the X7, and the most commonly skipped. Pump Armor is not optional. It is not something you do at the end of the season. It is something you do after every job, before you put the machine away — even if you’re going to use it again tomorrow.
Here is what happens when you skip it: latex paint left in the pump overnight dries on the inlet valve ball and its carbide seat. The ball bonds lightly to the seat. On the next startup, the ball doesn’t move freely when the piston strokes. The machine sounds normal — motor runs, pump strokes — but nothing draws up from the bucket because the inlet can’t open to let paint in. That is the Monday-morning won’t-prime call we get multiple times per week from X7 owners who didn’t run Pump Armor after Friday’s job.
The fix for a stuck ball is often simple — the pencil trick, a few taps on the intake housing. But a ball that sticks once will stick again. And a seat that has been pitted by repeated stuck-ball force-opens will need replacing. The $8 in Pump Armor that prevents this is one of the best ROI purchases in home improvement.
How to Do It Correctly
- After your final spray pass, switch the machine to PRIME mode. Place the suction tube in a small container with 6–8 oz of Pump Armor.
- Turn the machine ON. Let it draw the Pump Armor through the full fluid path — through the pump, up the hose, and out the gun trigger into a bucket.
- Run until Pump Armor comes out the gun tip — approximately 20–30 seconds. Turn OFF.
- Leave the machine in PRIME position with the drain tube in the Pump Armor container. The protective film left on all valve surfaces and seats is what prevents bonding.
✓ Which Pump Armor to Buy
Graco 17S980 is the 32-oz bottle — the right size for most homeowners. One bottle covers approximately 4–6 storage flushes. Available from any authorized Graco dealer. Do not substitute with mineral spirits as a long-term storage fluid — mineral spirits evaporates and leaves no protective film.
STEP 2 Flush Completely After Every Job — Not ‘Mostly’ Clean 10 minutes | Cost if skipped: $65 pump rebuild for dried valves
The second most important habit is also the most misunderstood. Most X7 owners flush the machine, but many stop too soon. ‘Mostly clean’ — clear fluid coming out for a few seconds — is not clean. Residual latex in the pump, hose, and gun hardens overnight and causes clogs, valve bonding, and tip blockages that look like mechanical failures but are entirely preventable.
Graco’s official guidance in manual 312667L is explicit: flush until the water runs completely clear. Not clear-ish. Not clear except for a little color. Completely clear. On a day where you’ve sprayed two or three buckets of latex, this may take 3–5 minutes of flushing. That’s 3–5 minutes of prevention against the stuck valve problem that’s coming otherwise.
Latex Paint Flush Procedure (PowerFlush Method)
- With pressure relieved, switch to PRIME. Point the drain tube and gun into a bucket.
- Connect the PowerFlush adapter to a garden hose and attach to the suction tube connection.
- Turn the garden hose on fully. Turn the machine ON. The water flushes the system under pressure — faster and more thoroughly than pumping from a bucket.
- Run until the water from the gun tip and drain tube runs completely clear. This typically takes 2–3 minutes.
- Run Pump Armor through the system as described in Step 1. You’re done.
Oil-Based Paint or Stain Flush Procedure
- Flush first with mineral spirits or the appropriate solvent until the solvent runs clear.
- Follow with a water flush to remove residual solvent from the pump and hose.
- Run Pump Armor. Do not skip this step after solvent-based materials — solvents that evaporate leave the pump dry, which is exactly the condition Pump Armor prevents.
⚠️ Never Stop at ‘Mostly Clean’
The residual 5% of latex that stays in the pump when you stop flushing early is the 5% that dries on the inlet ball seat, the outlet valve check ball, the gun filter housing, and the tip orifice. Every clog, stuck valve, and tip blockage we see traces back to incomplete flushing. Run the flush until the water is genuinely clear.
STEP 3 Strain Every Bucket of Paint Before Loading 2 minutes | Cost if skipped: $5–15 per tip and filter clog
Paint straight from the can looks smooth but contains debris: dried paint skin from around the can lid, manufacturing particulates, and in recycled or mixed paint, chunks of dried material that passed the visual inspection. The X7’s gun handle filter and spray tip orifice catch this debris — but catching it is not the same as passing it through. Catching it means a clog.
Every tip clog costs 2–5 minutes to clear via tip reversal. If the clog is severe enough to require pulling the gun filter, cleaning it, and reinstalling — add another 5–10 minutes. On a full painting day with 4–6 buckets, unstrrained paint can cost 30–60 minutes of spray time. A mesh bucket strainer costs $3 and takes 2 minutes to set up per bucket.
How to Strain Correctly
- Pour paint into a clean 5-gallon bucket through a mesh bucket strainer. Use a 60-mesh strainer for most latex; 30-mesh for thicker materials like primers.
- After pouring, insert the suction tube through the strainer into the bucket so any remaining debris is caught between the strainer and the bucket wall before it reaches the tube.
- Never use the last 1–2 inches of paint in a 5-gallon bucket without straining. The bottom of a used paint bucket accumulates dried flakes and debris that the rest of the bucket doesn’t contain.
- If using paint that has been sitting in the X7’s bucket between sessions, stir thoroughly and strain into a fresh bucket before reloading. Paint skin that formed on the surface will clog your tip immediately.
✓ The Fastest Clog Prevention on a Job Site
Keep a pack of mesh bucket strainers in the tool bag. They cost less than $1 each, fit over any 5-gallon bucket, and eliminate the majority of tip clogs before they happen. The contractors who never complain about tip clogs are the ones who strain every bucket. The ones who call us about constant clogging have never strained a bucket in their lives.
STEP 4 Replace the Gun Filter Every Bucket — Not When It Clogs 30 seconds | Cost if skipped: $5–20 per pressure-loss incident
The SG2 spray gun has a mesh filter inside the handle between the hose connection and the tip. Its job is to catch any debris that made it past the inlet strainer and bucket filter before it reaches the tip orifice. When this filter is coated with paint residue and debris, it restricts flow to the tip — producing exactly the same symptoms as worn pump packings: weak pressure, inconsistent fan, motor cycling faster than normal.
The mistake most owners make is not replacing the gun filter until they notice symptoms. By that point, the filter has already been restricting flow for long enough to cause pressure drop, which means the pump has been working harder than necessary to compensate. Replace the gun filter proactively — at the start of every new bucket during a production day, or at the start of every job session.
How to Replace the Gun Filter
- Relieve all pressure: trigger lock on, PRIME mode, trigger into bucket until no flow, machine OFF.
- Unscrew the gun handle filter housing — the lower section of the gun grip, counter-clockwise. Hand tight; no tools required.
- Slide out the old mesh filter. If it’s coated in debris or paint residue, replace it — do not try to clean and reinstall a heavily loaded filter on a working day.
- Drop in the new filter, reinstall the housing, hand-tight. Prime and resume spraying.
✓ Stock 15+ Gun Filters Per Machine
Gun filters cost under $2 each. On a production day with 4–6 buckets of paint, you go through 4–6 gun filters. Stock 15 at minimum per machine per season. The mid-job pressure drop that gets misdiagnosed as a pump problem — costs 20 minutes to diagnose, 2 seconds to fix with a fresh filter if you have one. Keep them in your apron pocket during spray days.
STEP 5 Run the Motor Cycling Interval Test at the Start of Every Job 60 seconds | Cost if skipped: $65–$400 if pump fails mid-job
This is the early warning system for your X7’s pump. It takes 60 seconds and tells you with reliable accuracy whether your pump packings are approaching the end of their service life — so you can order the repair kit and schedule the rebuild before the machine fails during a job rather than after.
The test works because a healthy packing stack maintains internal pressure against the closed system when no paint is flowing. When packings wear, internal pressure bleeds back through the seals faster — and the motor has to restart sooner to maintain the set pressure. This shorter restart interval is the measurable symptom of packing wear.
How to Run the Test
- Prime the machine completely with the paint or water you’ll be using.
- Switch to SPRAY mode. Point the gun into a bucket with no tip installed.
- Pull the trigger fully for 5 seconds, then release completely.
- Count the seconds from trigger release until the motor restarts.
| Interval Reading | What It Means | Action |
| 15–30+ seconds | Pump packings are healthy | Continue. Note the reading. |
| 10–14 seconds | Packings wearing — service approaching | Order 17V781 kit this week |
| Under 10 seconds | Packings worn — service due now | Rebuild before next job |
| Paint at packing nut | Cylinder damage risk — stop immediately | Do not operate further |
Log this reading at the start of every job. A downward trend over 3–4 consecutive jobs is your advance signal. Catching it at 12 seconds gives you time to order parts and schedule a weekend rebuild. Catching it at 4 seconds means you’re already risking a mid-job failure — and the cylinder scoring that happens when the machine runs past worn packings.
⚠️ The Cylinder Scoring Window
Once paint appears at the packing nut, the clock is running on cylinder damage. Paint bypassing the worn packings contacts the piston rod. Dried paint on the rod creates an abrasive layer that grinds against the cylinder bore. The window between ‘packings worn’ and ‘cylinder scored’ is approximately 2–3 weeks of regular use. A $65 packing kit becomes a $200–$400 cylinder repair if you miss it. Stop operating the machine immediately when paint appears at the packing nut.
When the cycling test tells you service is approaching, order the Graco Magnum X7 parts kit before the machine needs it. The 17V781 pump repair kit ships same-day on qualifying orders before 1pm CST from our Houston facility.
STEP 6 Inspect the Full Hose Length Before Every Exterior Job 2 minutes | Cost if skipped: $400+ for hose blowout injury or property damage
Hose inspection is the one maintenance step that is not primarily about protecting the machine — it’s about protecting yourself. The X7’s DuraFlex hose operates at 3,000 PSI. A hose that develops a soft spot, jacket crack, or fitting that’s beginning to weep is a blowout waiting to happen. Hose blowouts at 3,000 PSI cause fluid injection injuries that look like minor cuts but are medical emergencies requiring immediate surgical decompression.
Hose damage accumulates gradually and is invisible when the hose is coiled. A hose dragged across concrete on an exterior job develops jacket abrasion over several uses. Fittings exposed to repeated flexing at connection points develop micro-cracks that don’t weep under light pressure but fail under operating pressure. The inspection takes 2 minutes before each exterior job and catches these issues before they become emergencies.
Hose Inspection Procedure
- With the hose fully uncoiled, run your hand along the complete length while applying slight pressure. Feel for soft spots (internal bladder failure), bulges (pressure in a weakened section), or any roughness that indicates jacket damage.
- Inspect both ends: where the hose connects to the machine and where it connects to the gun. These connection points flex constantly and are where fatigue failure originates most often.
- Look for any visible weeping or staining at the fittings after any use. A fitting that leaves a paint residue ring on the surface it rested on after a job is leaking under pressure.
- Check the jacket along the full length for cracks, cuts, or abrasion through the outer layer. Any breach in the outer jacket is a failure risk regardless of whether the inner layer appears intact.
⚠️ Never Patch a High-Pressure Hose
Do not attempt to tape, wrap, or seal a damaged high-pressure hose. Replace it. A patched hose will hold at low pressure and fail at operating pressure — with the full 3,000 PSI energy release at the failure point. A replacement DuraFlex 25-ft hose (Graco 247339) costs approximately $45. An emergency room visit for fluid injection injury costs many times that and requires immediate surgical treatment. Replace damaged hoses immediately.
The Seasonal Service Schedule — What to Do at the Start and End of Each Season
Beyond the per-job habits, there are two seasonal service events that keep the X7 running reliably year after year. One at the start of the season, one at the end.
End of Season — Before Winter Storage
- Flush completely with clean water until the water runs completely clear.
- Run Pump Armor through the complete fluid path. Leave the machine in PRIME mode with the drain tube in Pump Armor.
- Run the cycling interval test before storing. If the interval is under 12 seconds, order the 17V781 pump kit now and rebuild before storing — not at the start of next season when you want to use the machine.
- Inspect the hose along its full length. Replace before storage if any damage is found — it’s easier to order parts in the off-season than to discover a damaged hose on the first job of spring.
- Clean the gun filter and tip thoroughly. Store the tip in a cup of water (latex) or mineral spirits (oil-based) to prevent orifice clogging during storage.
- Store in a frost-free environment. Pump Armor provides freeze protection, but it is not guaranteed below approximately 32°F for extended periods. Store the machine in a heated space if temperatures will drop significantly below freezing.
Start of Season — Before First Use
- Run the cycling interval test before loading any paint. This is the first diagnostic step of the season. If the machine sat through winter with Pump Armor correctly installed, it should return to its pre-storage interval. If the interval is below 12 seconds, rebuild before the season starts.
- Inspect the gun filter and replace if it was left loaded with dried paint or debris from last season.
- Test-run with clean water before loading paint. Prime the machine with water, switch to SPRAY, and run water through the gun for 30 seconds. Confirm the fan pattern is clean and pressure holds correctly after trigger release. A clean water test confirms the machine is ready for paint before you commit to a job.
- Check tip condition against the 25% fan-width rule. A 515 tip producing less than a 7.5-inch fan at 12 inches needs replacing before the season starts. Don’t start a new season with last year’s worn tip.
- Order a spare 17V781 pump kit and 17J876 inlet valve kit to keep on hand. These are the two parts most likely to be needed mid-season. Having them stocked before the season means a field repair is possible; not having them means a lost day.
The 6 Parts to Stock Before You Need Them
Every X7 owner should have these six OEM parts on the shelf before the season starts. Total investment: approximately $130–$160. Potential repair bill if any one of them is needed and not stocked: $200–$400 in service centre costs or machine downtime.
- 17V781 — Pump Repair Kit (~$65): The complete pump rebuild kit. Includes pressure control, outlet valve, inlet valve, drain valve, and PushPrime kit. The most important spare to have on the shelf. When the cycling test drops below 10 seconds, this kit goes in.
- 17J876 — Inlet Housing Kit (~$22): Ball, spring, and seat. Replace at the same service interval as the pump kit on any machine with 75+ gallons. The priming failure it prevents three months after a pump rebuild is caused by this $22 part.
- 17J880 — Outlet Valve Kit (~$18): The upper check valve. When the machine primes fine but pressure collapses during spraying, this is usually the cause. Accessible via the easy-access door without pump removal.
- RAC X 515 SwitchTip (×2): Keep two. Replace when fan collapses 25% from rated width. One spare in the kit at all times during spray season.
- Gun handle filters (15+): Under $2 each. Replace every bucket during production use. Stock generously — rationing gun filters is the false economy that causes 30-minute pressure-drop diagnosis sessions that a $2 filter swap would have resolved in 30 seconds.
- Pump Armor 17S980 (2 bottles): Keep two on the shelf. Run one bottle through the system between seasons. Use from the second as daily end-of-job storage. Restock before spring every year.
The Real Cost of Good Maintenance
The six habits in this guide cost approximately $130 in stocked parts and about 15 minutes per job in time. They prevent the pump failures, cylinder scoring, valve bonding, and hose failures that account for the overwhelming majority of X7 breakdowns we see as an authorized Graco dealer.
The $400 repair bill in the title of this article is not hypothetical. It’s the typical invoice when a cylinder bore gets scored because an owner ran the machine past visible packing wear. The bore replacement, packing kit, and inlet valve, plus the service centre labour if the owner can’t do the work themselves, regularly hits that number or exceeds it. All of it is preventable with a $65 pump kit installed on schedule and $8 in Pump Armor used after every job.
The Graco Magnum X7 is a reliable machine when it’s maintained. It is not a maintenance-free machine. The difference between an X7 that lasts three years and one that needs a full pump replacement after eighteen months is almost always the six habits in this guide — not the quality of the machine itself. Keep your Graco Magnum X7 parts stocked, run Pump Armor without exception, and the machine will earn its $379 price tag many times over.
About the Author
Nnanna Otuonye is the owner of SprayersAndParts.com, an authorized Graco dealer based in Houston, TX. SprayersAndParts.com supplies genuine OEM Graco parts to homeowners and painting contractors across the United States, with same-day shipping on qualifying orders from the Houston facility. Call 713-931-4102 Monday–Friday 8am–4pm CST.